 Detailed guidance for the first approach with your Shoutcast server 2.0 Free.
Once you've ordered your server, the system will send you an email with the following information:
- web address of the platform control panel
- Username and password to access the panel.
- password for live streaming .
STEP 1 - Preparing the Server
Connect with your control panel and click on the first blue button with 3 lines: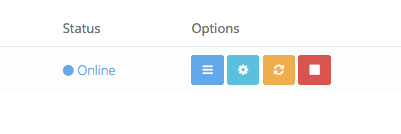
You'll find yourself on the main page for your server management: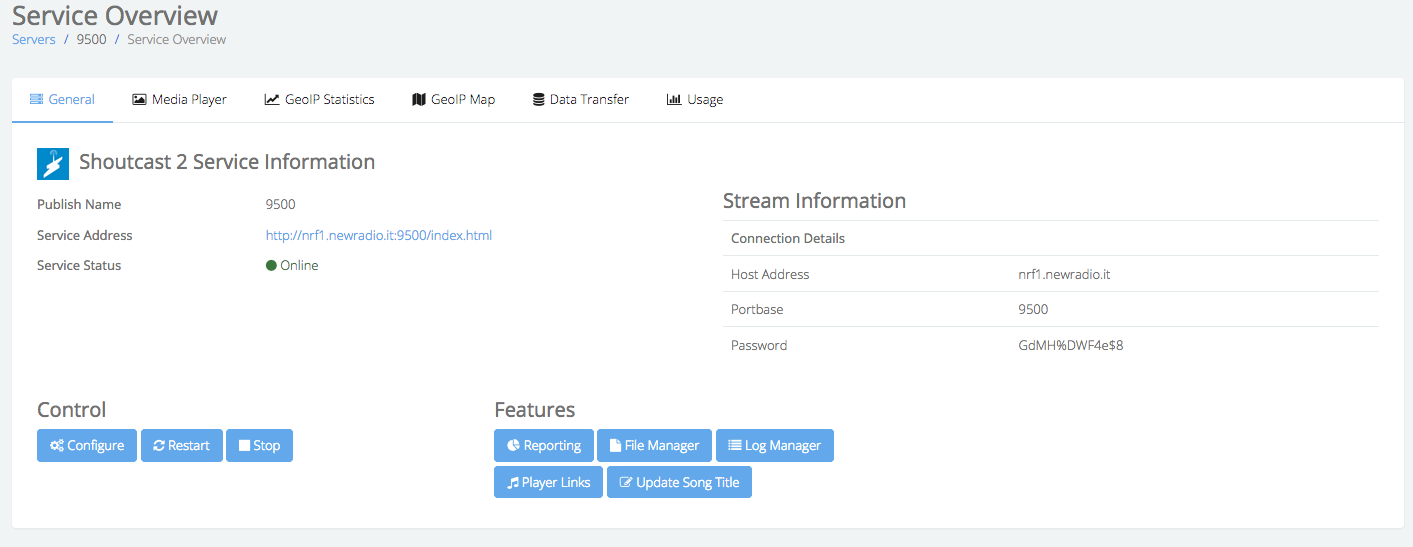
From this page you will see all the data and useful links to use your server. Below you can see the buttons to start (start), stop (STP) and reboot (restart) your server.
The 'configure' button allows you to enter in your server configuration. In fact, if you are not comfortable with the server parameters, we recommend that you do not touch anything. The server settings should already be perfect for your needs.
The only important fact that you can find in this page is the administrative password of the Shoutcast server (other than that of streaming) which you'll find under 'Admin Password'. It might be useful to create your audience Authash (Step 4 of this guide).
Remember that every time you press a key to start, restart or stop your server, the panel will take up to 60 seconds to perform the operation. A written overlay will notify you of the missing second execution of the command.
ATTENTION VERY IMPORTANT:
Due to a current BUG (error) on the MediaCP panel, if the first time you access the main page of your server (Service Overwiev) in the 'Stream Information' field you will find the error message:
Statistics Parser Error :: Bad Login / Authentication Failed
Proceed in this way to correct the problem:
Click on the 'Configure' button and on the first page at the bottom, in the 'Admin Password' field, remove any characters '%' in the password.
Once the characters have been removed click on the button at the bottom of 'Update Configuration' making sure that the item 'Restart Service to apply changes' is checked.
Your server will reboot within 1 minute and regular data will appear in the 'Stream Information' field.
STEP 2 - On Air
In the section 'Stream Informations' of your control panel, you'll find all the information necessary for connecting to your server as the server address (host address) and port (Portbase)
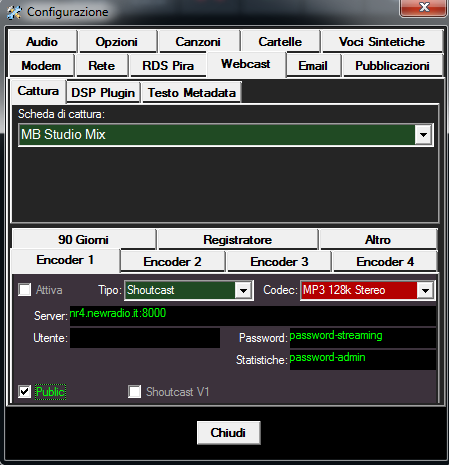
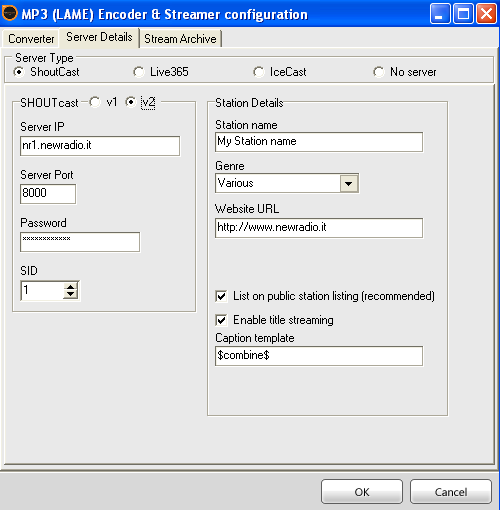
The encoding program that uses (eg. MBStudio, MBRecaster, Winamp, etc.) enter the following information:
- Server type: Shoutcast 2
- Audio Format: Mp3 o aac+
- Bitrate up to 96k .
- NomeHost:port,1 (server address : server port / mountpoint name or SID number (probably will be '1'))
- Password: streaming password sent by email during activation.
- Password Statistics: the administrative password you find in 'configure your server' section of your panel. (Only for MBStudio and MBREcaster).
- Press the connect button
Here are some configuration examples of some programs:
 |  | 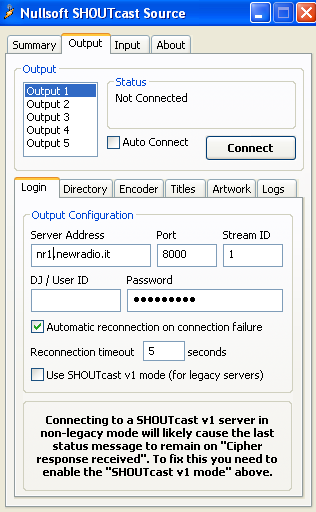 | 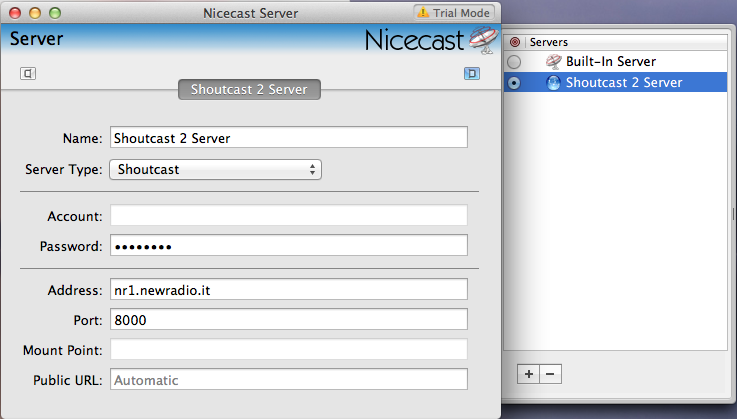 |
| MBStudio / MBRecaster | SAM Broadcaster | Winamp | Nicecast (Mac) |
Note for MBStudio/MBRecaster:
Anyone using one of these programs, from the 8.55.8 version you must enter in addition to streaming password, even the server admin password in the 'Statistics'. you find in 'configure your server' section of your panel..
If this field is left blank, no statistics will be shown on MBStudio / MBRecaster.
Just started the encoder your radio is on the air.
STEP 3 - PLAYER HTML5
To listen to your channel and get the code for your HTML5 player, the root of your server panel click on the top page on the Tab 'Media Player'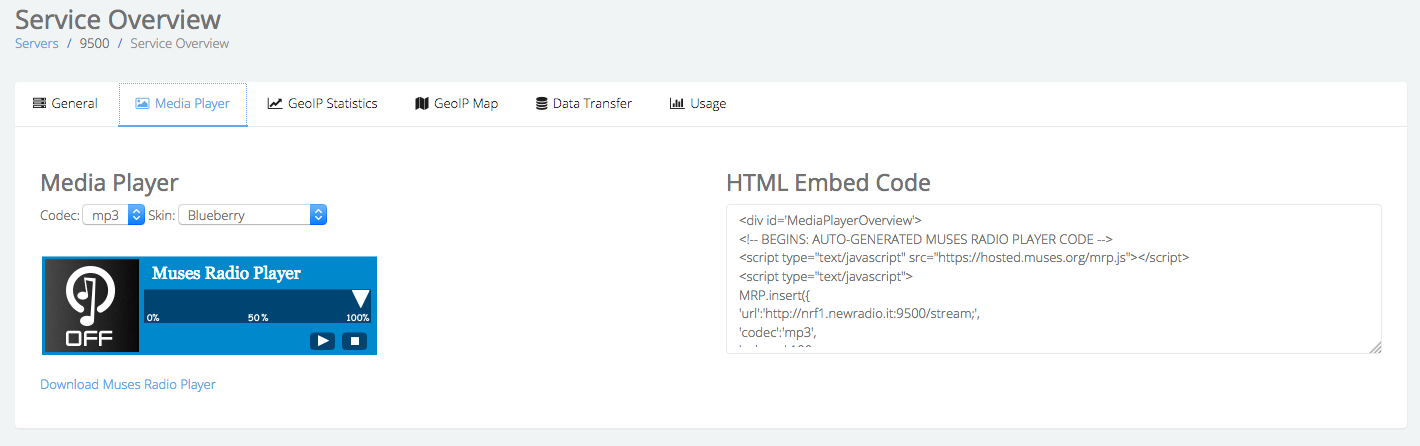
Here you will find the configurator for your HTML5 player base. You can choose the skin of your liking and set the audio format, depending on whether you use MP3 or AAC +.
Once configured format and skin, copy from the box on the right you see the html code and paste it in your site where you want to bring up the player.
In the code, there are some parameters that you can change according to your needs. Eg:
'Volume': 100, (possibly replace with the percentage of starting volume from 1 to 100)
'Autoplay': false, (replace with 'true' if you want the player starts playing automatically)
'Buffering': 5, (replace with the number of seconds to buffer you want to use to make the stable player. We recommend the value '2' and in any case never exceed the value '5')
'Title': 'Muses Radio Player', (Replace with the name of your radio, for example, 'Capital Radio')
'Welcome': 'Muses Radio Player', (Replace with a message that you want to appear at the opening of the player, such as 'Welcome to Capital Radio')
The other parameters of the code we recommend not to touch them.
This integrated is a great player, but if you want to have maximum compatibility and numerous additional functions (such as song titles on the air, the covers of songs from iTunes or from your director, sharing on facebook and twitter, and more) you we recommend buying our HTML5 player PLAY5
In the section 'Player Links' in your control panel (between the lower right button) you will find the codes if you want you can publish on your pages to make listening to the radio with the integrated player in the computer as Winam, Windows media player, VLC quicktime, and many more.
STEP 3 - STATISTICS AND INFORMATIONS
The panel provides a lot of information about your service and your listening statistics.
In the top Tab 'GeoIP Statistics' you will find the list of listeners in real time (as of the moment' with their geolocation.
In Tab 'GeoIP Map' there is a real-time map that shows you where your listeners of the moment are located.
Clicking on the 'Reporting' button at the bottom you can instead access to your listening Historical statistics. From this page you can analyze the data for days, weeks and months of the listeners who listened to your radio.
Important: By clicking on the tab 'Data Transfer' you can see the traffic consumed during the current month. The free service includes a monthly traffic included 250 Gigabyte. Here you can check your traffic and decide whether it is sufficient or whether you need to bring the limit to 1 terabyte per month by purchasing the TERA PLUS option that has a cost of 15 € per year. The option, if you have not enabled on the server, you will be able to buy at any time within your customers accessing your service area Newradio Free.
STEP 4 - CREATION OF AN AUTHHASH (make the stream public on Shoutcast.com site)
Since
December 2018 Shoutcast has completely changed its policy. It no longer
freely allows you to register your radio on its directory if the
version of the server used is not 2.6 or higher.
Currently our company provides the Shoutcast2 service with version 2.5 which is still the best and most stable.
To
publish your radio on the Shoutcast directory, you need to create a
code (called 'authash') that you can no longer create yourself. If you
do not have your own authash file previously created on another server,
our company can create one for you.
Open a support ticket on our site:
https://www.newradio.it/client/submitticket.php?step=2&deptid=2
Request the generation of the authash code for Shoutcast2 and provide us with the following information:
Name of the radio
A brief description of the radio
Address of the radio site
A contact email
Proposed musical genre
City of belonging
Within 24 we will generate the code and we will take care of inserting it on your server.
You will receive an email confirming the success of the operation.
P.S.
We do not yet know until Shoutcast will allow the creation of authash for server version 2.5.
Newradio will not be held responsible for any removal from the directory by shoutcast.com or the impossibility of registration.
