 A detailed guide for the first approach with your Shoutcast server 2.0.
Once you have ordered your server, the system will send you an email with the following information:
- Web address on the control panel of the platform
- Username and password to access the panel .
- password for live streaming .
ATTENTION:
The HTTPS service will be activated on your streaming server within 24/48 hours of activation
Remember that the links in https are to be used only for listening.
To connect from your encoder to the server you must continue to use the normal link and port.
STEP 1 - Preparing the server
Log in to your control panel and click on the menu "configure server" .
Title on stream write the name of your radio, put on website URL address of your website.
In the section you will find the default mountpoints " / stream"; this is the first and the main of the server . Other mountpoints can be purchased separately and create additional mount points in this section. You can use the same server for different transmission bit rate . The total number of slots remains the same regardless of the number of mountpoints .
If a player uses HTML5 or Flash do not recommend you to enter file Introduction and fallback . Could block the players.
All the other settings , if not very practical on Shoutcast , you should not touch them.
Click UPDATED . Your server is ready to be programmed .
IMPORTANT : Whenever you make any change in the configuration (settings) of the server, you still need to restart the server itself to make the changes effective. Sufficinte is not saving the settings .
STEP 2 - NOW PLAYING
At this point, after configuring the server , go to the main page of your panel by clicking on the "Overview" .
On the menu click on " Server / Start" .
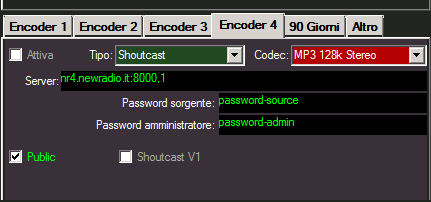
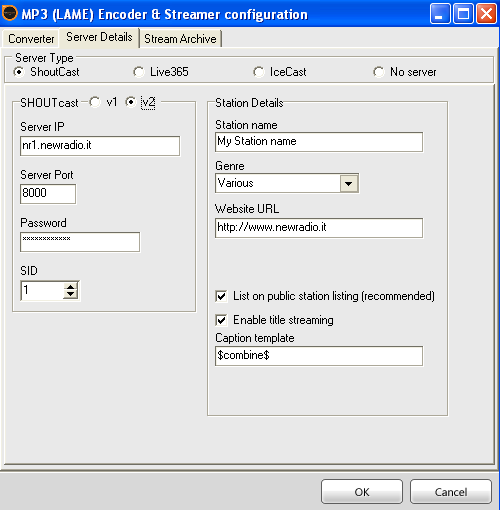
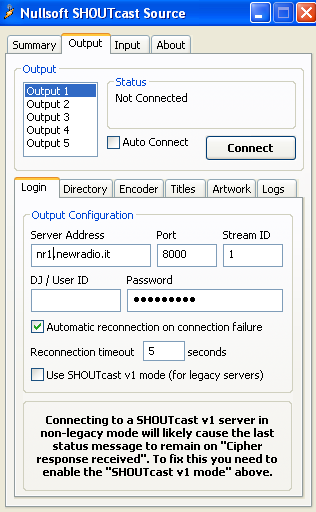
On the encoding program you are using ( eg MBStudio , MBRecaster , Winamp etc. . ) And enter the following data:
- Server Type : Shoutcast
- Audio Format: MP3 or AAC +
- Bitrates up to 192k ( 128k recommend max ) . The sum of the mount point must not exceed the limit of the server.
- HostName : port / stream ( server address provided in the email sent to activate the service : port of the server / mountpoint on which you want to convey )
- On some programs, such as MBStudio MBRecaster and enter in the server: HostName : port 1 (the number after the decimal is the number of the mount point on which you want to convey )
- Password: The password streaming emailed during activation ( not to be confused with the admin password ) .
- Press the connect button
Here are some configuration examples of some programs:
 |  |  | 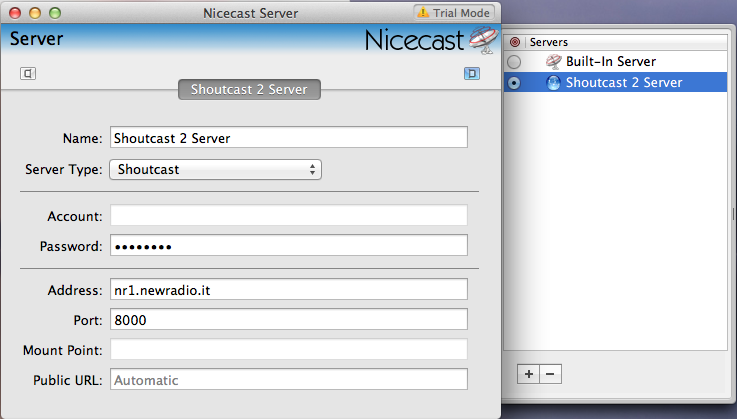 |
| MBStudio / MBRecaster | SAM Broadcaster | Winamp | Nicecast (Mac) |
Notes for MB Studio / MB Recaster:
Anyone using one of these programs, from the 8.55.8 version you must enter in addition to streaming password, even the server admin password in the 'Statistics'. Normally it coincides with the password of the CentovaCast panel.
If this field is left blank, no statistics will be shown on MBStudio / MBRecaster.
Your radio is on the air and you can see the historic track in the central part of the panel.
IMPORTANT: Until the new update, whenever a command to start / stop / restart the server, even though the command response proves to be positive , the left menu is not automatically updated . Before continuing, we recommend that you always update the page by clicking on " Overview " .
To listen to your channel you can click one of the links you find on the top right of the panel .
In the " general / quick links" menu you will find as the first entry in the upper link to your personalized " Your Start Page test for streaming " which can give the person concerned to make listening to your radio , show titles and statistics . If you have your own website , from your webmaster links that are always on the quick links in the " Links for listening ." Using the server aac + , the best way to exploit its full potential on your site is to order our HTML5 Player .
In the section " Configuration / Widgets" menu you can configure and generate a lot of code Html / javascript that the webmasters can use for your pages on the site of the radio.
STEP 3 - CREATING A AUTHHASH ( make public the stream on the site Shoutcast.com )
Since December 2018 Shoutcast has completely changed its policy. It no longer freely allows you to register your radio on its directory if the version of the server used is not 2.6 or higher.
Currently our company provides the Shoutcast2 service with version 2.5 which is still the best and most stable.
To publish your radio on the Shoutcast directory, you need to create a code (called 'authash') that you can no longer create yourself. If you do not have your own authash file previously created on another server, our company can create one for you.
Open a support ticket on our site:
https://www.newradio.it/client/submitticket.php?step=2&deptid=2
Request the generation of the authash code for Shoutcast2 and provide us with the following information:
Name of the radio
A brief description of the radio
Address of the radio site
A contact email
Proposed musical genre
City of belonging
Within 24 we will generate the code and we will take care of inserting it on your server.
You will receive an email confirming the success of the operation.
P.S.
We do not yet know until Shoutcast will allow the creation of authash for server version 2.5.
Newradio will not be held responsible for any removal from the directory by shoutcast.com or the impossibility of registration.
